Some companies and software projects become outright famous for their excellent developer documentation - Stripe, Twilio, and Django to name a few. Let’s look at the building blocks that make these and other projects’ documentation so great.
We will look at the main sections that you should consider when documenting your own projects:
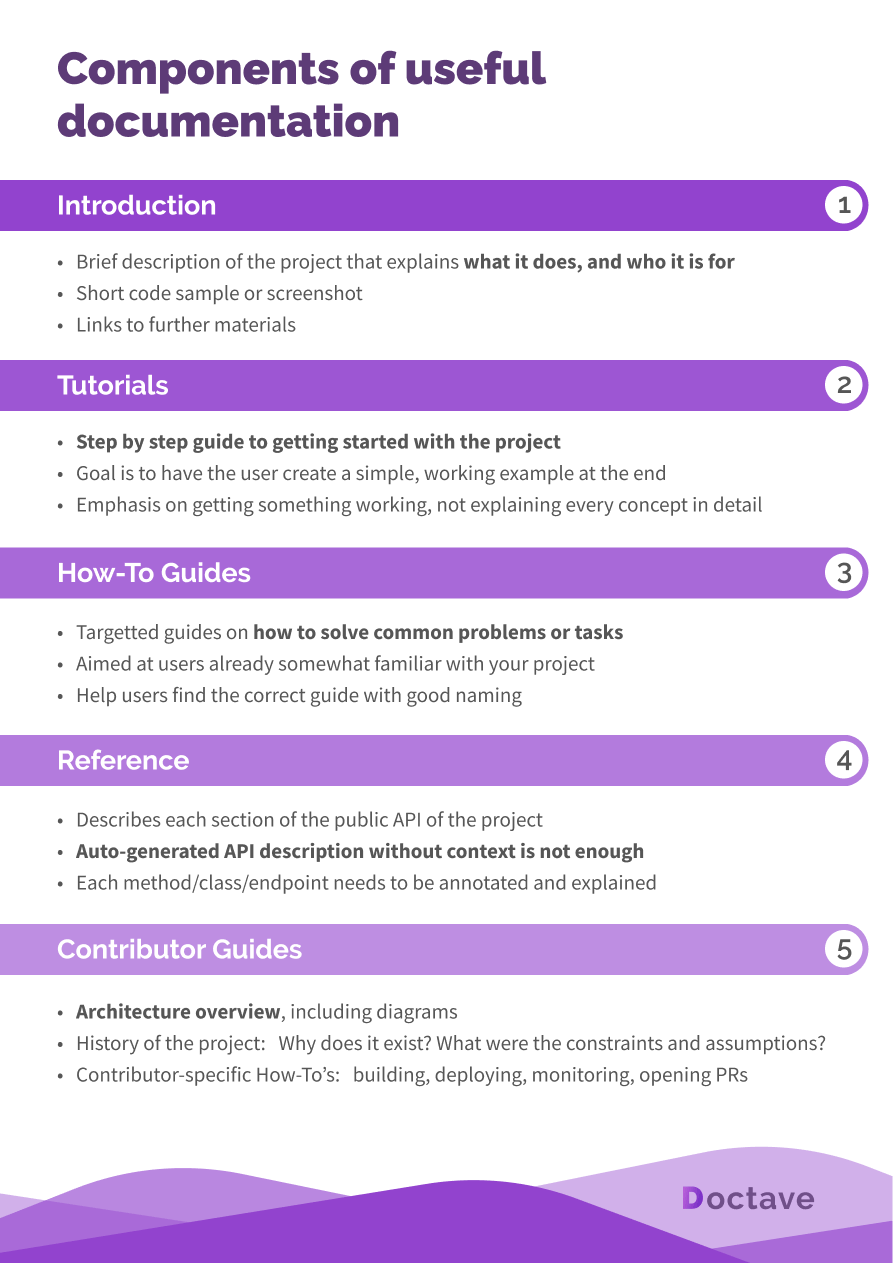
- A concise introduction
- A tutorial to get new users started
- How-to guides to solve common use cases or issues
- A reference for your API
- Finally, often forgotten, contributor documentation
Which of these you focus on will depend on how your project is consumed. An internal private project
at $dayjob will have slightly different needs than an open source project to be used by the wider
developer community. But in any case, this is a good starting point to start structuring your
documentation.
Introduction
A developer’s first point of contact with your project will usually be your README file at the root of your repo. The purpose of the README is to explain the basics to a new user:
- What does the project do?
- Who it is for?
- How do I start using it?
You should always start with a 1-2 sentence description of the project. As an example, here is how the Devise project describes itself:
Devise is a flexible authentication solution for Rails based on Warden.
Let them know right away if this project does what they need. After that, you can describe things in a bit more detail. What makes your project different from others? Are there some special features? Just a paragraph or two with maybe a couple bullet points, just to give the user a bit more context.
Consider including a small code snippet, or a screenshot or gif if the project has a UI. Pictures (or indeed code snippets) are worth a thousand words - just remember to write proper alt tags.
If your project is what the user is looking for, you need to tell them how to start using it. Think
of this as your “call to action”. If possible, give the exact command the user needs to run in the
terminal or paste onto their project to get started. The D3 project does
this by giving multiple ways to install the library, from running npm install d3 to adding
<script src="https://d3js.org/d3.v6.js"></script> to your site.
Finally, tell them where to go next. Your introduction is just a taster of the larger project; a taster. You should point them towards in-depth directions for where to next, which brings us to…
A tutorial
Now that we have a new user interested in using your library or service, you need to walk them through their first real encounter with the code. And you do this with a tutorial. You need to be a teacher - put yourself in the mind of a newcomer to your project, and pave a clear path for them to becoming a productive user.
What makes a good tutorial? Here are a few points to consider.
-
It ends with the user having built something that works. You want your users to succeed, and not frustrate them during the first steps. For Devise, mentioned above, this might mean building a working sign up form, or for D3 it might mean drawing your first graph on the page.
-
It does not over-explain. At this stage, you can’t explain every little detail about how your project works. You need to show them a clear path, and purposefully leave out details to get to something that works. Once they have that first success, and have developed a feel for how the system behaves, you can start adding more details. But that time is not now - leave the tangents and nitty-gritty details for later.
-
It does not take forever. If it takes a full day for a user to reach that moment of success, very few will persist that long. Depending on the complexity of your project, you should aim for maximum 15-30 minutes to get something up and running.
For inspiration, check out the Ruby on Rails Getting Started with Rails guide. Rails is a large and complex framework, and so the guide is on the longer side, but it walks through setting up a new Rails project, and building a simple blog application from scratch. Enough for a user to feel comfortable to start building something more complicated on their own.
Conveniently, once the user has completed the Rails tutorial, at the end we find a “What’s Next?” section. The section, among other things, points you towards the Ruby on Rails Guides. Which brings us to…
How-to guides
Once the user has gotten somewhat familiar with your project and has had some successes using it, we want to provide them more in-depth guides on how to use more advanced features and solve commonly encountered issues. Unlike with the tutorial, this is where you do want to get into the weeds, and explain complex concepts in full.
Vue.JS has a section in their documentation called the Cookbook. It walks through tasks you’d expect users to have to do in a more complicated application. In Vue’s case form validation, avoiding memory leaks, unit testing components, and more.
One trick to consider is to frame each guide as an answer to a question that a user might ask. For example: “How to add auto-incrementing primary keys”, or “How to migrate to API v2”.
For a new project, this section is very much a living document. Over time you’ll get questions or tickets from your users with recurring themes. This is a hint that you probably should write a guide to answer that specific concern. Not only will it make your docs more complete, it will reduce your support burden. To get started, think about the 3 most common tasks a user would do with your project, and write a guide for each of them.
Unfortunately, any complex enough project is going to be near impossible to document 100% with guides like this. You will inevitably run into a use case that you haven’t considered, and you don’t want your users to be at a loss when that happens. Therefore, you need…
Reference
A reference document which lists each element of your project’s API is probably what many first imagine when they think of documentation. This is what your users reach for when your guides no longer help, and they want to see all the possible things they can do with a project. They already know the basics and the lay of the land, and want to dig into the details.
Modern languages like Rust and Elixir make producing pretty documentation sites take next to no effort, but pretty much every language has some way of generating API documentation. And if you are building a REST API, tools like Swagger can help you produce nice docs for your endpoints.
Unfortunately, this is not enough. API documentation that gets generated without careful curation has very little utility, and is maybe only marginally better than just reading the code. As an example, the LLVM project has extensive and useful guides, but their API reference docs leave a lot to be desired.
In order for your generated documentation to be meaningful and useful, you have to annotate each function/class/method/endpoint such that the user understands it in the greater context.
Rust is a shining example of how this can be done well - take a look at the generated API docs for the Clap CLI argument parsing library’s main data structure. Each method has an explanation, often multiple paragraphs long, and includes a usage example - the reference is teaching you how to use the program, not just describing what it is.
But none of this comes for free. You as the creator of the project have to go and write those annotations to actually make your API documentation useful for the end user.
Once your users become well versed with your project, chances are they might want to contribute back to the project. Or maybe your new colleague needs to get up to speed to start reducing your backlog. This is when you need…
Contributor documentation
This type of documentation often gets overlooked, and really warrants its own article. High quality docs for people working on your codebase are extremely important. Especially so in companies where engineers come and go, and you may be asked to work on systems where the original creators are no longer around. In fact, in cases where there are few end users, but many contributors to your project, this is probably the most valuable documentation you can write. So, how do you make it easy for others to contribute changes to your project?
Contributor documentation is structurally similar to tutorials or how-to guides. You want to walk developers through the steps to make their first contribution, and then provide more information for then when they are working on more complex changes.
What do you put into your contributor documentation?
-
Getting started guide: How do you set up your development environment? How do you build the project? How do you run the tests? This is how you combat “works on my machine” syndrome. Write down the steps to get started, and update and clarify them over time as things change. Hint: you should ideally not just test these guides every time someone new joins the project. Test them regularly - ideally before new joiners start, to make sure they have a good onboarding experience.
-
Architecture diagram: Don’t even think about auto-generating this, for the same reason you shouldn’t auto-generate your API reference documentation. Get your diagramming tool of choice, and graph out the main components of the system, and how data flows through the program. It doesn’t have to be incredibly detailed - it’s a map for others as they dive into the code for the first time. This helps them mentally place the code they are reading into the bigger picture.
-
Common how-to guides: Some projects will have recurring changes over time, like a new route or a database migration in a web app. For mature projects there are usually some project-specific nuances to how these tasks have to be done. If you find yourself explaining them to new developers, write them down. Similarly, runbooks and operating procedures with links to production logs, monitoring dashboards, and alert consoles should all be part of the guides.
-
Historical context: This is especially important in internal projects. If you are tasked with working on a 5 year old code base, it helps to know its history. Why was it built? What were the requirements and constraints? Why is the architecture like it is? Why were these architectural decisions made? One way to keep track of this is an Architecture Decision Record (ADR). You might also consider putting the notes from key meetings directly into your documentation. Having this context helps develop a bit of empathy between developers. It is easy to think that you would not have made the same mistakes the original creators made - usually life is more complicated than that.
Summary
Good documentation can help on many fronts - getting more users for your open source project, helping your colleagues get up to speed, or helping reduce technical debt; a well documented project is easier to support, easier to use, and more resilient to changes in contributors.
Writing excellent documentation takes some effort, and it requires a different mindset to writing code. But just like you smile when the new library you want to use is well documented, your users, contributors, and colleagues will thank you when your documentation makes their life easier.
To finish up, we’ve included a summary of what was discussed above. Feel free to use it when thinking about how to document your next big project.
You can also download it here as a PDF.
Articles about documentation, technical writing, and Doctave into your inbox every month.